GeneBio Systems
LiveBand™ Agarose Gel System(Electrophoresis Tank + blue light transilluminator)
LiveBand™ Agarose Gel System(Electrophoresis Tank + blue light transilluminator)
SKU:SVL-2
Couldn't load pickup availability
Product Overview
The LiveBand™ Agarose Gel System is mainly used for rapid agarose electrophoresis separation experiments of small amounts of DNA and RNA samples.
What’s in the Name-LiveBand™?
How often do you find yourself eager to check if your PCR worked, or whether your clones contain the right inserts—whether from colony PCR or minipreps? Just minutes after starting your gel, you're pausing it to take a quick look, only to resume it so the bands can finish resolving. It's a hassle: put on gloves, stop the gel, remove the lid, carry the gel to the transilluminator—only to put it all back and continue running.
With the LiveBand™ system, you can watch your gel in real time—seeing the bands as they resolve, without interrupting your run. In a way, you're watching a live (DNA) band. That’s exactly why we named it LiveBand™.
Product Features
1. The gel maker mold is integrally formed, which can make four different sizes of gel blocks.
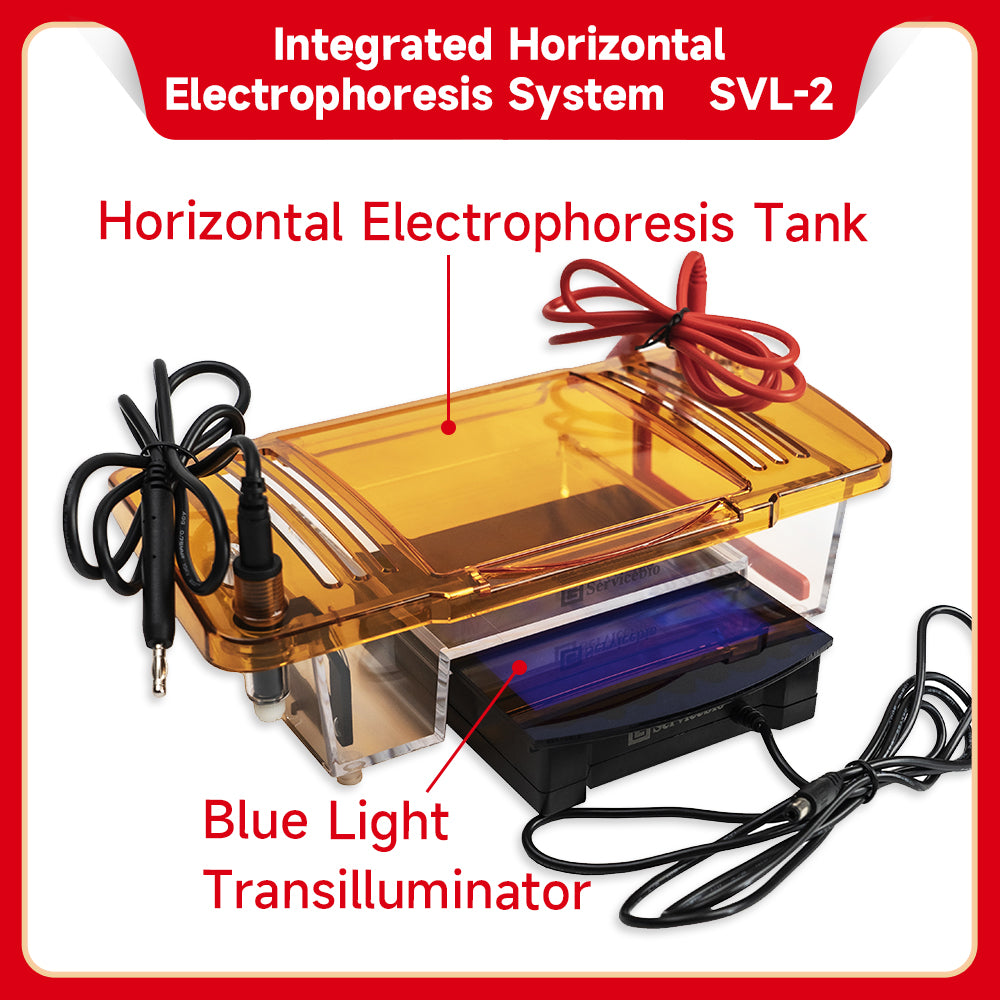
2. Standard blue light transilluminator, with SPW-6S electrophoresis power supply, can directly observe the band during the electrophoresis process.
3. The transparent upper cover has a hole design, which is convenient for heat dissipation and observation.
4. Card slot limit function, accurate operation.
5. The electrode holder and electrode head are detachable, which is convenient for cleaning and maintenance.
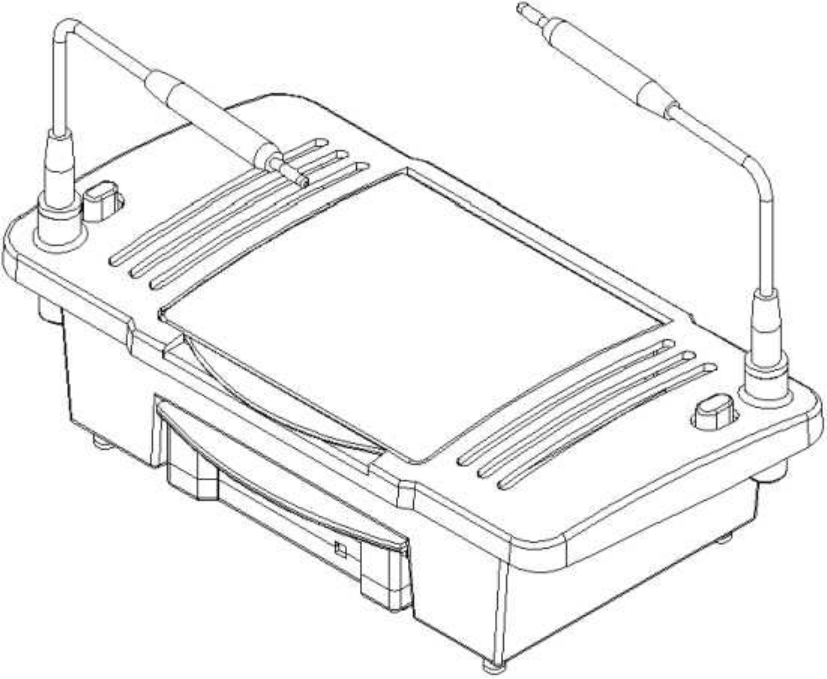
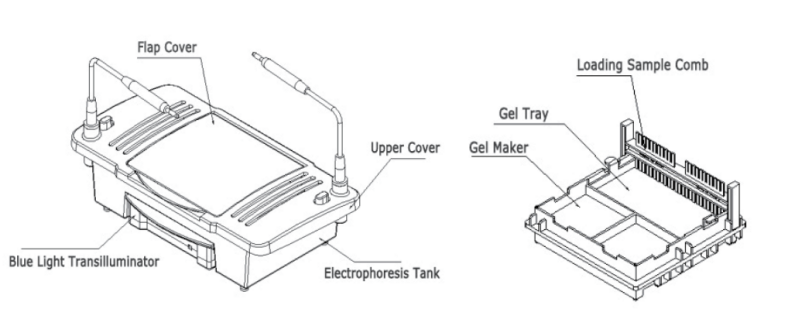
Product structure
Product Specifications
|
1 |
Product number |
SVL-2 |
|
2 |
Specifications and Dimensions (LXWXH) |
310X150X120mm |
|
3 |
Gel Tray Specifications (LXW) |
Largegel 120mm X 120mm; Widthgel 60mmX120mm; Longgel 120mm X 60mm; Smallgel 60mmX60mm |
|
4 |
Specimen Comb Specifications |
1.0mm 25/11 teeth 1.5mm 13/6 teeth 2.0mm 3/2 tooth |
|
5 |
Blue light wavelength |
470nm |
|
6 |
Buffer capacity |
260mL |
|
7 |
Weight |
1kg |
Operation Steps
Please ensure that the horizontal electrophoresis tank, gel tray, sample comb, gel maker and other components are clean and dry before gel preparation.
1. Preparation
Weigh an appropriate amount of agarose into an Erlenmeyer flask, add an appropriate amount of buffer, place it in a water bath, a magnetic heating stirrer or a microwave oven and heat until it is completely melted, shake well and make an agarose gel solution.
2.Gel Making
Place the gel maker horizontally on the experimental bench, select a suitable gel tray (different sizes of gel trays are selected according to different experimental needs, the specifications of the gel tray are 120mmX120mm , 120mmX60mm , 60mmX120mm , 60mmX60mm), put the gel tray Place it in the gel maker (two pieces of 60mmX60mm gel can be made at the same time, and only one piece can be made for other specifications) and put the sample comb in a fixed position. Add 5ul DyeNA-View Gel Stain (or other nucleic acid dyes) solution to the agarose gel cooled to about 55°C . After mixing, carefully pour it into the gel tray, and slowly spread the gel until the entire surface of the gel tray is uniform. For the gel layer, let stand at room temperature until the gel is completely solidified, and then gently pull out the sample comb vertically to complete the preparation of the gel plate.
3.Sample Loading
Take the prepared gel and the gel tray out of the gel maker together and place them in the electrophoresis box with the sample addition hole close to the negative electrode (black is the negative electrode). Add running buffer until the gel plate is covered.
Use a 10ul micropipette to add the samples to the sample grooves of the rubber plate respectively. After each sample is added, a sample addition head should be replaced to prevent contamination. When adding samples, do not damage the gel surface around the sample wells (pay attention to the order of adding samples) .
4. Electrophoresis
Cover the top cover according to the correct position of the positive and negative poles (red is positive, black is negative), insert the electrophoresis wire into the electrophoresis power supply according to the correct color, and select the appropriate voltage to start electrophoresis (the specific electrophoresis parameters are adjusted according to the actual experimental parameters) .
The sample moves from the negative (black) to the positive (red) direction. As the voltage increases, the effective separation range of the agarose gel decreases. The electrophoresis was stopped when the bromophenol blue moved to about 1 cm from the lower edge of the gel plate.
5. Observation
This integrated horizontal electrophoresis instrument is equipped with a blue light transilluminator, which can observe the electrophoresis situation in real time with ( SPW-6S electrophoresis power supply ).
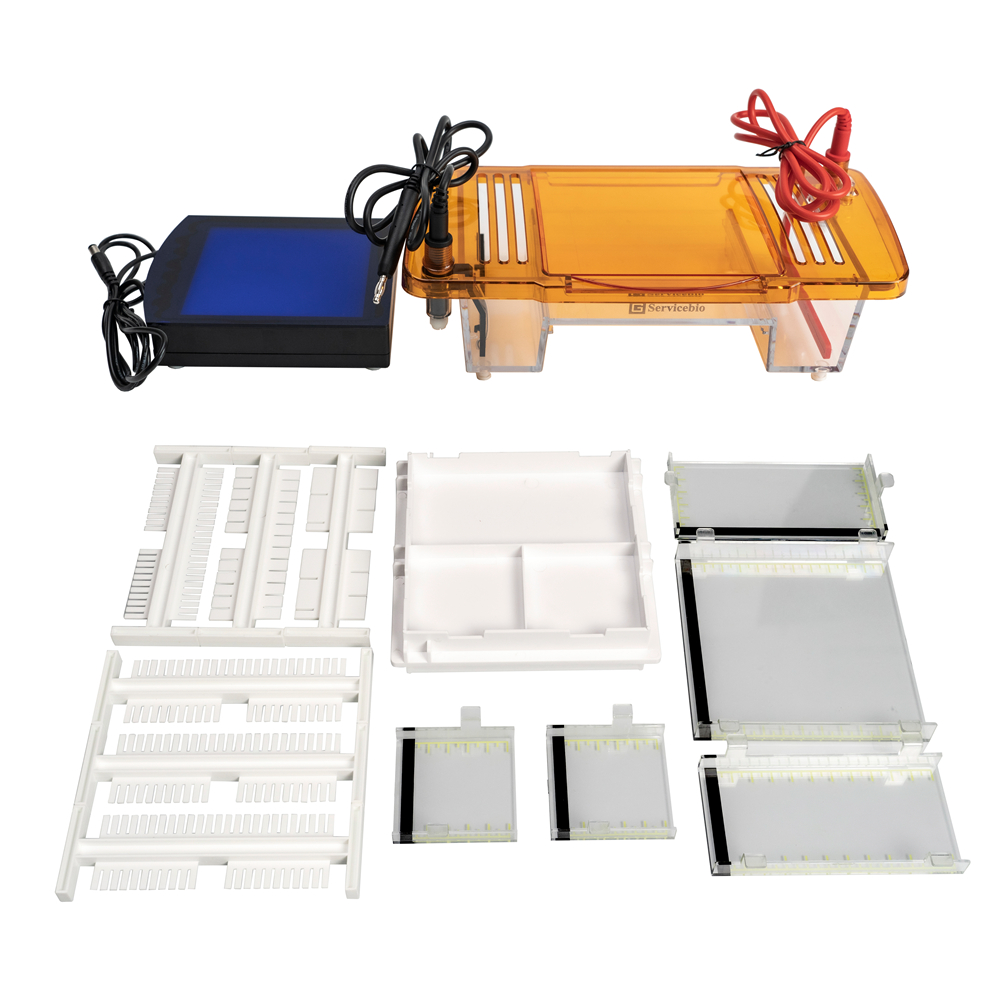
Product configuration list
|
serial number |
name |
quantity |
|
1 |
Horizontal electrophoresis apparatus |
1 set |
|
2 |
Gel maker |
1 |
|
3 |
1.0mm 25-tooth/11-tooth sample comb |
4 |
|
4 |
1.5mm 13-tooth/6-tooth sample comb |
1 |
|
5 |
2.0mm 3-tooth/2-tooth sample comb |
1 |
|
6 |
60mm X 60mm Gel Tray |
2 |
|
7 |
60mm X 120mm Gel Tray |
1 |
|
8 |
120mmX60mm gel tray |
1 |
|
9 |
120mmX 120mm gel tray |
1 |
|
10 |
Blue light transilluminator |
1 set |
Precautions
1. Do not operate this product with electricity (the top cover of the horizontal electrophoresis apparatus must be covered before the electrophoresis power is turned on after the sample is added, and do not touch the horizontal electrophoresis apparatus during the electrophoresis process to avoid the danger of electric shock).
2. All parts of this product can be washed with water, just dry naturally or dry with absorbent paper. Do not bake at high temperature to avoid damage to the product.